Analytics

Friday, August 22, 2014

DIY Copper Garden Art from Copper Tubing

I love the look of copper in the garden-so much so that I have made a few different pieces for my garden and also a rain chain.  I like to use copper tubing because it is flexible and I can manipulate it any way that I want.  The added bonus is that it is beautiful and elegant.

I created this recently from a roll of copper tubing, some concrete and an old nursery pot:
DIY copper garden art

Here is another piece I made last year:
DIY copper garden art
 Here is a picture of the first one I created a few years ago:
DIY copper garden art
These pieces of garden art are extremely easy to create-you just need to use your imagination and find your artistic side.

In this post I will show you how I created my newest addition to my garden so that you can go out there and create one for your garden.

For this project you will need:
1.  An old nursery pot (I think this is a 3 gallon size) and a roll of duct tape.
2.  A bag of concrete mix-any will do.  I use Quikrete.  Also a tub to mix the concrete in.
3.  A roll of copper tubing (I picked this one up at Menards it is enough for a couple of projects)
4.  A pair of tin snips or pipe cutter.
5.  A tape measure (optional)

Here are the steps to create your garden art:

1.  Use the duct tape to cover the holes in the bottom of the nursery pot like this:
2.  Roll out the tubing and cut into the length you desire.  For mine I cut them into 6 foot lengths.  Just a note-I like to work in odd numbers so I cut 5 lengths for this project.
3.  Mix up the bag of concrete according to the package directions.
4.  Let the concrete sit for a few minutes to hydrate then add to the nursery container.
5.  Let the concrete sit for a few minutes then start inserting the copper tubing into the concrete like this:
6.  In order to hold the tubing in place I use a nylon tie at the top:
7.  Let sit for a week (if you use regular concrete) to cure.
8.  After the concrete has cured you can cut the nylon tie:
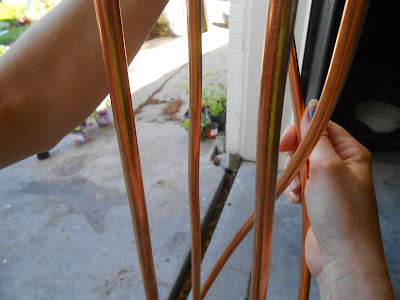
9.  Use your hands to gently bend and guide the tubing-do not bend to sharply.  This will cause a crimp.  Always bend slowly. 


Now start on the next one:
Just continue to bend each piece to achieve the look you want.  Just remember that this is your piece of art-it does not need to be perfect.

Almost done:
After I had it the way I wanted it I did solder a few of the areas together just to be sure it was sturdy:
You will also notice that it started to patina-I did this treatment before I put it in the garden so I wouldn't kill or damage any plants.  If you want to keep the copper color you might want to seal it.

10.  Cut off the pot.

11.  Find a spot in your garden:
12. Dig a hole and plant your piece of art:
12.  Sit back and enjoy your own piece of art:-))
DIY copper garden art
I hope you try this project out-you can create your own original art work that you will love and your neighbors will admire.  And of course it was easy!

Until next time-Happy Planting!

Rhonda


Tuesday, August 5, 2014

Save Your Heuchera Seed to get Free Heuchera

Since it is the time of year that all those beautiful Heuchera are setting seed I thought I would share with you how to save those seeds so you can grow your own for free.  I personally love Heuchera-they are very adaptable, carefree, generally pest and disease resistant and come in some amazing colors.  One thing I do not like about them is the price-some can range from 6.00 to upwards of 15.00.  So to combat the price a few years ago I started growing them from seed using my own seed and also by exchanging seeds with others.  I now have upwards of 40 plants (probably closer to 50) and more than half I grew from seed.  The best part of growing them from seed is you don't know what you are going to get-sometimes a new "hybrid" will pop into the mix.  A few varieties will come true from seed, these include "Dale's Strain" and "Palace Purple" while others will hybridize and maybe give you something unique.  Here are pictures of a few of the Heuchera I have grown from seed:
Here are the steps to save those seeds and make your own:

1.  Gather up a bowl or container to put the seeds and seed heads in.

2.  Find a Heuchera that has browning flower stems and seed heads.  They will look like this:
3.  Now grab the stem with your hand below the last set of seed heads like this:
4.  Now "cup" your hand around the stem and run your hand firmly up the stem to pull of the seed heads and even some stems like this:
5.  Put the seed heads in a bowl:
You can see here the very tiny black seeds that have fallen out of the seed heads already:
6.  Transfer to a paper plate for drying.  I usually leave them to dry for a few weeks and also don't forget to label the plate with the name:
7.  After you let them dry for a few weeks you can separate the seed from the chafe (seed heads etc).  I use an old kitchen sieve-it does pretty good.
Crush the seed heads up to get out any seeds that may be in there:
Here they are:
8.  Now get a seed baggie ready-I prefer to use plastic zip baggies that I pick up in the craft aisle at Walmart but some prefer to use paper envelopes or even make their own.  Use whatever you like just be sure to label with the name, date, and I like to put G which means they are from my garden.
9.  Put the seeds in the seed baggie and store in a cool and dry place until you are ready to sow.  It is not necessary to store them in the refrigerator.

Here are a couple more of my seed sown Heuchera to give you some inspiration:


My preference for starting them from seed is by using the method referred to as Wintersowing.  I have had awesome results using this method to germinate most of my perennials and even some annuals.  I highly recommend you give it a try.

I hope you go out and save those seeds making new Heuchera is easier than you think!  Until next time-Happy Planting!

Rhonda