Do you ever walk in to a store to buy a particular item and end up getting distracted by something else? I do! It happens all too often. In fact, recently I went to my local Menards store to pick up some supplies for a few concrete projects and walked through the wood department. There sat a pile of cheap wood and I suddenly lost sight of my mission. At the bargain basement price of 1.69, I now had a new project in mind. I had been seeing some really neat ideas on Etsy and Pinterest for wooden scarecrow faces-but most didn't have instructions to make them and some were links to buy them-which irritates the heck out of me. So I grabbed a couple of pieces and headed to the checkout with an idea in my mind-I was going to make one and it will be easy and cheap!


Just like some of my other projects I didn't have to go out and spend a bunch of money and I didn't have to use any power tools. It is easy and most of the time making it was spent waiting for the paint to dry. Here are a couple pictures of the end project:
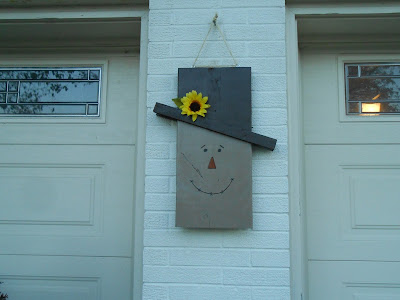 |
| DIY Reversible Fall/Winter Decoration-Scarecrow side |
 |
| DIY Reversible Fall/Winter Decoration-Snowman side |
|
|
So here is the wood I used for this project (the 2 small pieces were scrap wood that I had laying around):
 |
| Wood pieces used for snowman/scarecrow project |
Here is a list of what I used:
1. A 2x12 piece of wood
2. 2 scrap pieces of 1 1/2 x 18 in
3. some small nails
4. A hammer and a staple gun (optional to attach flowers)
5. some glue-I used Elmer's Glue All
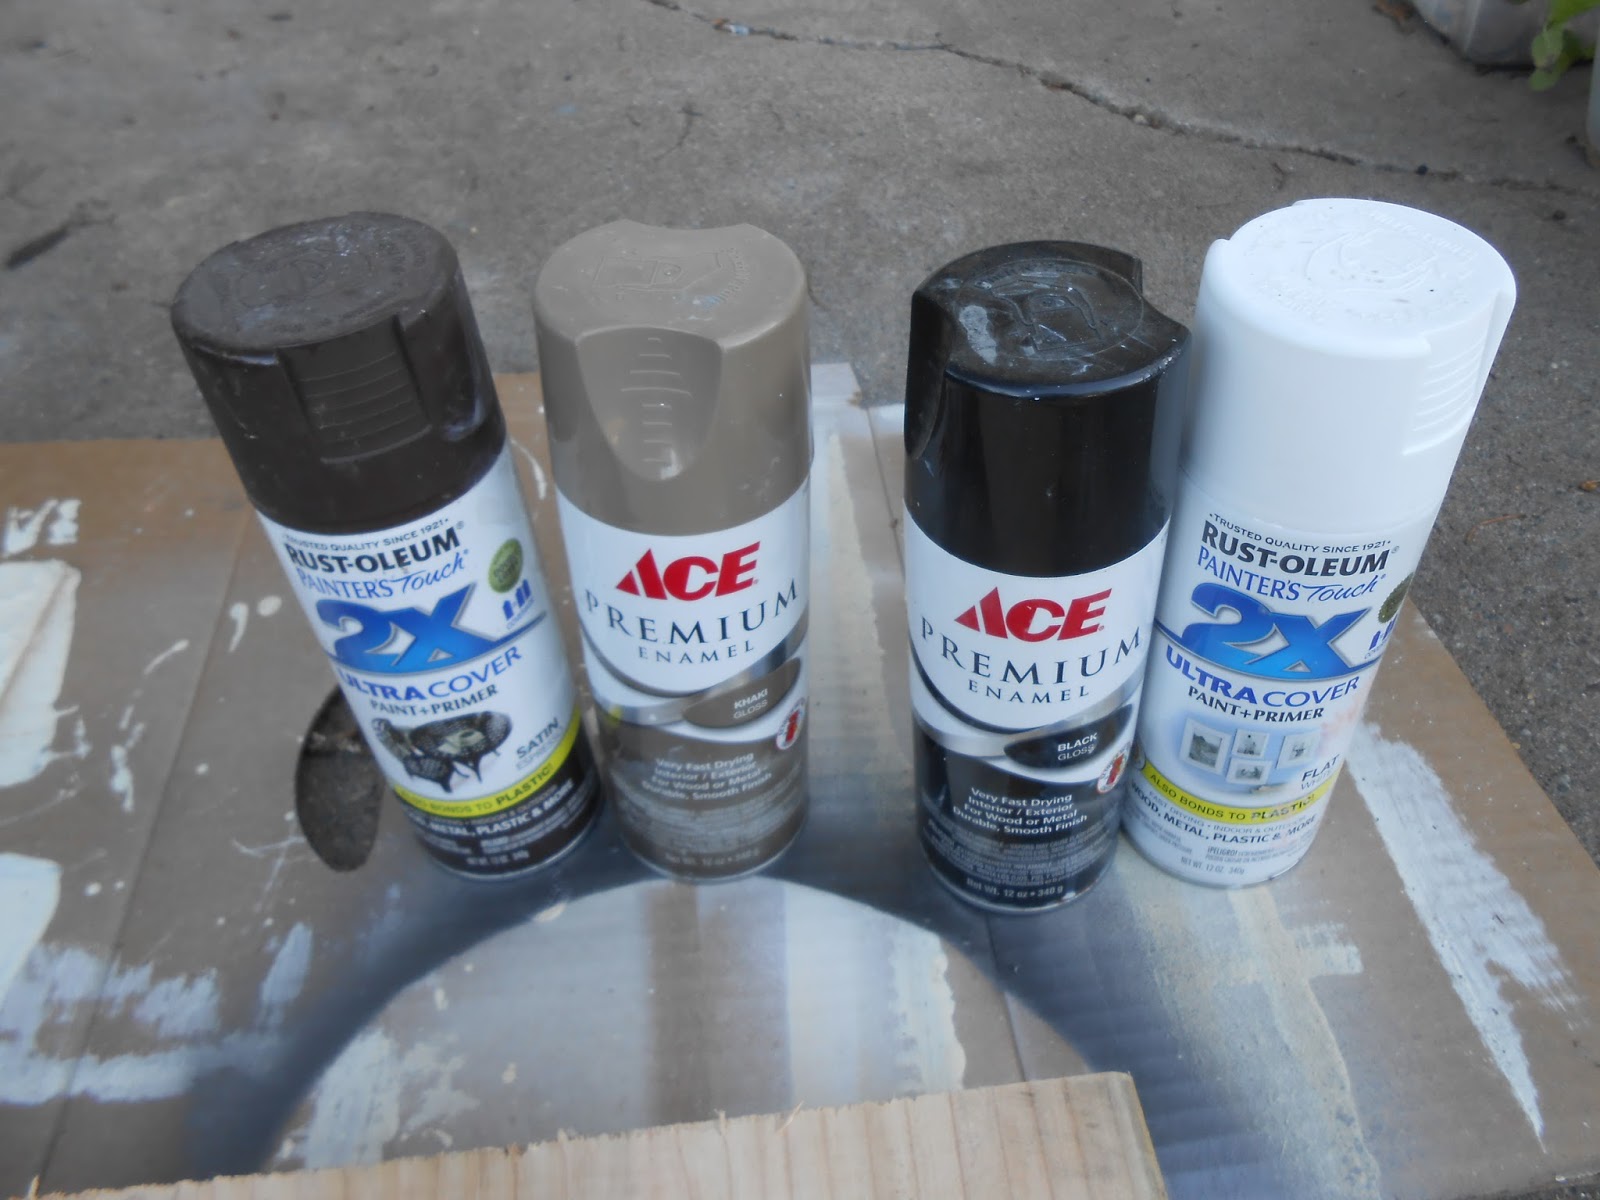
6. Spray paint-I used black, white, khaki and brown (you can use whatever colors that you want-it is your "art")
7. a couple of fake flowers-I used 1 poinsettia and 1 sunflower for decoration
8. paint and small brushes to make the faces
9. 2 small screw eyes
10. some twine
So here are the steps to create your reversible scarecrow/snowman:
1. Lay your large piece of wood on a piece of cardboard (or plastic) on the ground and line up the smaller wood across the board so that it looks somewhat like a hat brim. Try to have the same amount of overhang on each side. I went about a third of the way down and tilted it like this:
2. When you have it in a position you like then draw a line-this will guide you when you attach it.
3. Now take the glue and run some along the small board-if there is an "ugly" side glue that side:
Do not go to the edge-only glue where there will be contact with the large piece of wood:
 |
| Spread glue evenly |
 |
| Spread glue evenly |
4. Place the strip of wood in position (the line you drew earlier) and hammer a nail in place at each end:
 |
| Nail down the strips for the hat |
Make sure to hammer the nail down all the way:
5. Attach the other strip of wood in the same way-but be sure to line them up with each other so that they are exactly even:
 |
| Make sure both sides are even with each other |
6. Once you have attached the hat brim it is time to paint. I used spray paint which I already had on hand-but you can use whatever paint you prefer. Tape off the sections if you need to. I am messy so I always do:-))
 |
| Spray paint I used |
Paint one section at a time and let dry. I applied 3 coats of paint.
 |
| Snowman side painted |
 |
| Scarecrow side painted |
7. When it is painted and the paint is dry you can add the flowers. I had bought some fake flowers from The Dollar Tree:
 |
| Cheap fake flowers for decoration of the hats |
Pull a flower off of the stem and snip the end off so it is flush:
 |
| Trim off plastic tip from fake flower |
place the flower on the hat-I used a pointsettia for the snowman:
 |
| Add fake flower |
Staple or nail it down-try to hide the nail or staple:
 |
| Staple fake flower down |
Here I used a sunflower for the scarecrow:
8. Now is the time to draw on/paint a face-I am a terrible artist so this was the worst part for me. I am so terrible with using a paintbrush that I ended up using Sharpie markers because I was making a mess with the paints. Here is the scarecrow face side:
 |
| Add a face to the scarecrow side |
Here is the snowman side:
 |
| Add a face to the snowman side |
9. Add the screw eyes to the top:
 |
| Screw eyes to hang the wooden decoration |
twist them in good:
 |
| Add eye screws |
 |
| eye screws |
10. Run the twine through the screw eyes and knot it. I doubled up my twine to give it strength:
 |
| Twine |
 |
| Run twine through eye screws |
11. Ready to hang:
 |
| Wooden reversible scarecrow/snowman hanging decoration |
 |
| Wooden reversible hanging scarecrow/snowman decoration |
See-I told you it was easy! No special tools or paint needed and you don't need any special artistic skills. You also don't need to go out and spend 20-30 dollars on a piece of fall decor especially when you can make it yourself. You can make any adjustments you need to make this work for you. It is only a guide and/or inspiration to create your own unique piece. So, give this project a try and make it your own! I hope you enjoy this post and watch for my next post for another fall/winter project that will also be easy and kinda cool:-))
Until next time-Happy Gardening!
Rhonda


this is cool as all get out love it xx
ReplyDeleteThank you:-))
DeleteI did lot of review about wood working plan and I found one of the best website, I am using for my wood working, it contains all woodworking plans include workbench plans, shed plans, chair ... WOODPRIX has the best handbooks and ready instructions.
DeleteGreat craft idea!
ReplyDeleteThanks!
DeleteThis comment has been removed by a blog administrator.
ReplyDeleteReally great news!!! this information is well worth looking everyone. Good tips. I will be sharing this with all of my friends! Thank you for sharing valuable information.
ReplyDelete________________________
Woodworking
This comment has been removed by the author.
ReplyDelete
ReplyDeleteI really appreciate this post. I've been looking all over for this! Thank goodness I found it on Bing. You have made my day! Thank you again
Economy Tarpaulins
Hello, i think that i saw you visited my weblog so i came to “return the favor”.I’m attempting to find things to improve my website!I suppose its ok to use some of your ideas!!
ReplyDeletecandy jar
There are no width dimensions for any of the pieces. 2 x 12; 2" thick by 12" what - length or width? 1 1/2" x 18" but what is the width? Poor details.
ReplyDeleteI think this is one of the most significant information for me.
ReplyDeleteAnd i’m glad reading your article.
wordpress
blogspot
youtube
មាន់ជល់
This article is fantastic. Its very nice blog. Thanks for sharing this. tarpaulin
ReplyDeleteWonderful information sir...
ReplyDeletebungee cords