Pages

Monday, July 28, 2014

How to use Spray Paint to Create an Easy Faux Copper Patina

In my last post I repurposed a candle holder into a stand for a bowl of succulents.  In case you missed it here is a photo:
When I originally purchased the stand it had more of a brushed nickle finish on it which was not the look I was going for.  Here it is before I painted it:
A closer look at the base:

What I wanted was the look of aged copper-but I wanted it to be easy and cheap.   So I went to my favorite craft and DIY tool-spray paint.  This project is sooo easy and it is cheap too (an added bonus).

For this project you will need:
1.  Object to paint
2.  Sandpaper
3.  Spray paint-I used Rustoleum in Hammered Copper, Rustoleum 2x in Expresso and Rustoleum 2x in Seaside (if you want more of a green patina chose a greener spray paint such as Lagoon)
4.  2 dry paint brushes
5.  A piece of cardboard or plastic to work on
6.  A spray sealer in a matte finish
That's all you need!

Here are the steps to create your faux patina:
1.  Take a piece of sandpaper and rough up the surface of the project-it only needs to be scratched up a little-don't worry about sanding it down completely.

2.  Take the copper spray paint and apply it to your piece making sure to cover all the nooks and crannies.  After it is thoroughly covered let it dry completely.  You need to do this 3 times (3 coats of copper) and then let it dry completely between coats.

3.  When the copper paint has dried on your piece it is time for paint number 2-expresso.  Get your brush ready-leave it dry-and grab the can of paint.  Spray a small puddle on the piece of cardboard:
Dab your brush in the little puddle of paint then dab and brush it on the piece-make sure to grab only a little paint at a time.  You want some of the copper to show through.
Just keep dabbing and brushing until your piece looks similar to this:
Here is a blurry closeup:
Notice how I didn't totally cover the copper-just covered it up here and there.  Let the brown dry completely on the object before moving on to the next step.

4.  Grab your second paint brush and your blue or green spray paint.  Spray a small puddle on to the cardboard or plastic (just like in step 3) and dab your brush in it:
Now start dabbing and brushing your project with the blue/green paint like this:
Just continue to add blue/green in random areas-make sure not to cover the brown and copper entirely.  Note-you will have to keep loading your brush with paint-it can dry pretty quickly.  Just spray a little at a time on the cardboard.
After you cover the piece in the blue/green color you need to let it dry completely.

5.  Grab the brown brush and paint again-now is the time we tone down some of the blue/green paint.  Spray a small puddle on the cardboard again and dab the brush in it.  Then dab and brush on to tone down some of the blue areas:

You can put on as much or as little as you like-my piece ended having quite a bit of blue left:
After you have added as much brown as you wanted let it dry completely.

6.  Seal with a Matte spray paint sealer.

Here is a pic of the completed project:
This patina project was easy and cheap!  Most of the time it took was spent waiting for the paint to dry:-)  I hope you try this project out-it can be used on anything you intend on spray painting-even planters or pots!

Until next time-Happy Planting!

Rhonda


Thursday, July 24, 2014

What Can You Do with a Thrift Store Candleholder?

You make a succulent garden or birdbath!

A couple of weeks ago I stopped at a Salvation Army thrift store to see if they had anything interesting I could put to good use.  As I was walking around I spotted this freestanding candle holder that was made of metal and instantly knew I could do something with it.  It was bent up a bit and the price was a little steep for me at $4.95, but I snatched it up anyway and took it home.  Here is what it looked like:
The top:

 After thinking about it for a couple days I decided it would be perfect as a stand for a succulent garden.  I had thought of using it as a birdbath stand but wanted something I could bring in to the house when it gets cold out.  Here is what it looked like finished:


1.  My first step for this project was to make a lightweight concrete bowl for the top-it is a recipe that contains mostly perlite so it is lighter than standard concrete (I can't remember my exact measurements for this recipe-I experimented with quite a few to get what I needed).  Here is a pic of the bowl-you can see how much perlite I used:
(Note:  I let the bowl cure for at least a week before planting in it)

2.  My second step was to remove the candle holders on the top of the stand-this took the work of my husband who got them off quite easily (all except the middle one).  I also bent "feet" and "arms" to level them out.
I ended up using a cutting disc for my drill to grind off the middle piece but a hacksaw should work fine-I made sure to cut of the candle holder but left the rod to hold the bowl.
3.  Next step was to use sand paper and rough up the surface for the spray paint:
4.  After I sanded it I gave it 3 coats of spray paint-I used Hammered Copper from Rustoleum (make sure to let dry completely between coats):

5.  When the copper is dried I used spray paint to create a faux patina (here is the link: http://sproutsandstuff.blogspot.com/2014/07/how-to-use-spray-paint-to-create-easy.html)  Here is what the patina looked like:
6.  After the stand was completely dry I sealed it with a matte top coat to preserve the faux patina.
7.  In order for the bowl to sit on the top of the stand and be stable I drilled a hole that would fit the rod I left in the middle:
Start with a smaller bit and drill the hole then move to a larger bit to make the hole bigger-this helps to prevent cracks and chips when drilling:

8.  Plant up the bowl with some succulents, I used non-hardy succulents so that I can bring this in in the Fall:
Here is the finished project-I love they way it looks on my deck:-))
I am very happy with the way this project turned out-it is amazing what a little paint and handywork can create from someone else's "junk". I went with a faux patina because I have copper yard art that has a patina and I wanted to simulate that effect.  You can just use 3 coats of regular spray paint if you do not like the patina look-here is what the stand looks like before the patina effect:
Watch for my next post on creating the faux patina using spray paint!

Until next time-Happy Planting!

Rhonda


Thursday, July 17, 2014

Moving a Leafed Out Hosta with the Help of a Belt and Some Tape

Denial-that is what I am in every time I plant a Hosta.  I know it is going to grow and get big I just don't believe it at the time.  This is probably because I usually purchase bare root Hosta from online retailers and they usually have only a few leaves and 1 or 2 eyes (eyes are what growers call a Hosta division).  They seem so small that when I go to plant them I lose all sense and end up putting them where I will eventually have to move them.   Here are a couple of examples of some small Hosta I planted that will eventually be very large (given time):  Here is Hosta "Liberty" which I planted last year.  It is hard to believe from her size right now she will eventually be 6 feet wide.
Hosta "Liberty"
Hosta "Sagae" will reach about 6 feet wide-but right now only about a foot wide:
Hosta "Sagae"
Hosta "Guacamole" will eventually reach under 5 feet-only 2 feet right now.
Hosta "Guacamole"

 So this denial leads to my Summer ritual which involves moving these beasts to a more appropriate position in the garden without setting them back too much.   Using a pitchfork loosens the roots without cutting them like a shovel would do.  The tape helps to make digging and moving it easier and also keep the Hosta leaves upright so the roots can pump water up the stems.  


What you will need for this:
1.  A pitchfork or perennial fork-I prefer to use a pitch fork to move my plants I feel it causes less damage to the plants roots than using a shovel
2.  A shovel to dig a new hole
3.  Masking tape or painter's tape
4.  An old belt with a D ring (or a piece of rope)
Steps to move the Hosta:
1.  Dig a hole where the Hosta is going to go or prepare a container for the Hosta.
2.  Take the belt (or rope) and place it around the bottom of the Hosta:

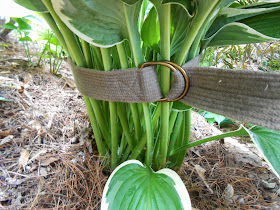
3.   Now pull the belt (or rope) up around the stems of the plant:
pull it tight enough to hold the stems and leaves up-as tight as possible without breaking the stems or leaves.
4.  When it is tight enough tie it off.  If a couple leaves escape that's OK:-))
5.  Get the tape out and run the tape sticky side out around the Hosta either above or below the belt-I prefer above to keep the leaves in a tight bunch.
6.  Wrap the tape around 3 or 4 times.  When you have taped the Hosta you can release the belt and remove it.
7.   Now grab your pitchfork.  Shove it in the ground around the base of the Hosta and wiggle it back and forth (up and down) where you inserted it in the soil.  This is to loosen the roots from the soil.  Do this all the way around the base of the Hosta.
When you get back around to where you started the Hosta should be pretty loose if not keep working the pitchfork around and under the Hosta until it gets loose.  If you have tree roots holding your Hosta in place take a pair of pruners and cut them.  It should be loose enough to remove if not use the pitchfork to pry it up like this:

8.  Knock off extra dirt by dropping it a couple of times in the hole:
9.  Now place it in the hole that you have dug making sure you are planting it at the same depth it was at.
10.  Backfill the hole with dirt and water well:
11.  Keep well watered until the Hosta becomes established in it's new home.  Leave the tape on for a few weeks (until it loosens)-it will help keep the Hosta leaves upright while the Hosta recovers from the move.

Here is a picture of Hosta "Honeybells" that I moved about a week ago.  You will notice how the tape keeps the leaves from wilting and flopping (even in a sunny position).
This technique can be used with any size Hosta that is fully leafed out-just make sure to keep the Hosta well watered until it becomes established-which may take the rest of the season.

If you purchase a Hosta and are unsure of it's potential size here are some resources to help you :  http://www.hostalibrary.org/ or you can visit some of the online retailers that specialize in Hosta-my favorite is Hallson's at http://www.perennialnursery.com/ I like Hallson's because there are forums where you can ask questions and you can search for Hosta and information by different categories like size, color, and name.

Just remember that Hosta are hard to kill-as one gardener once said :  "Hosta can be run over by a car in the driveway...and they will survive" (Ken from Gardenweb).  Believe it or not this statement is true.  Hosta are very resilient perennials and can survive just about anything you do to them including moving them in them in the heat of Summer. So, if you need to move that Hosta, don't worry about it and just do it! 

Until next time-Happy Planting!

Rhonda